Shiny in production with the prodverse
Welcome! You are one step closer to learning how to deploy a public-facing Shiny app with the prodverse. This app will be public-facing, meaning that anyone with the URL will be able to access it, however, it will be protected by Google authentication. This means that only people you add as a test user will be able to access the app.
Deploying a private app usually involves organization-specific configuration, firewall rules, and other security measures. If your organization uses Google as its identity provider, you can use this guide to deploy a private app with minimal additional configuration.
Prerequisites
- A Google Cloud Platform (GCP) account: You will need a GCP account to create a project and enable the APIs that the prodverse uses. You can create a free account here.
- A Google Cloud Platform project: You will need a GCP project to deploy your app to. You can create a project here.
- A domain name: You will need a domain name to deploy
your app to. This can be a subdomain of a domain you,
for example,
example.comormyapp.example.com. - (Optional) An internet connected Linux VM: You might want a virtual machine to run the prodverse on. This is optional since you don't fully need it, you can run the example app on your local machine, Linux, Mac, or Windows. However, if you want to share your app with others, it is recommended to use a VM. This guide will assume that you have a Linux VM with Docker installed.
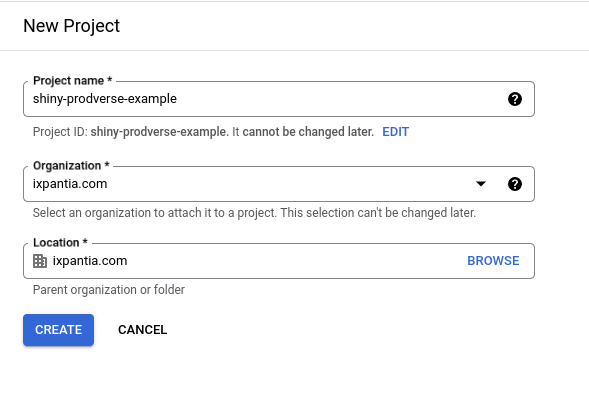
Step 1: Create a GCP project
If you already have a GCP project, you can skip this step.
- Go the following link: https://console.cloud.google.com/projectcreate
- Name your project
- Click
Create
Step 2: Create an OAuth consent screen
If you already have an OAuth consent screen, you can skip this step.
- Go to the following link: https://console.cloud.google.com/apis/credentials/consent
- Select
Externaland clickCreate: If you are in an organization, you might want to selectInternalinstead. If you are using a personal GCP account, you will not be able to selectInternal.Internalwill allow you to share the app with people in your organization without having to add them as test users.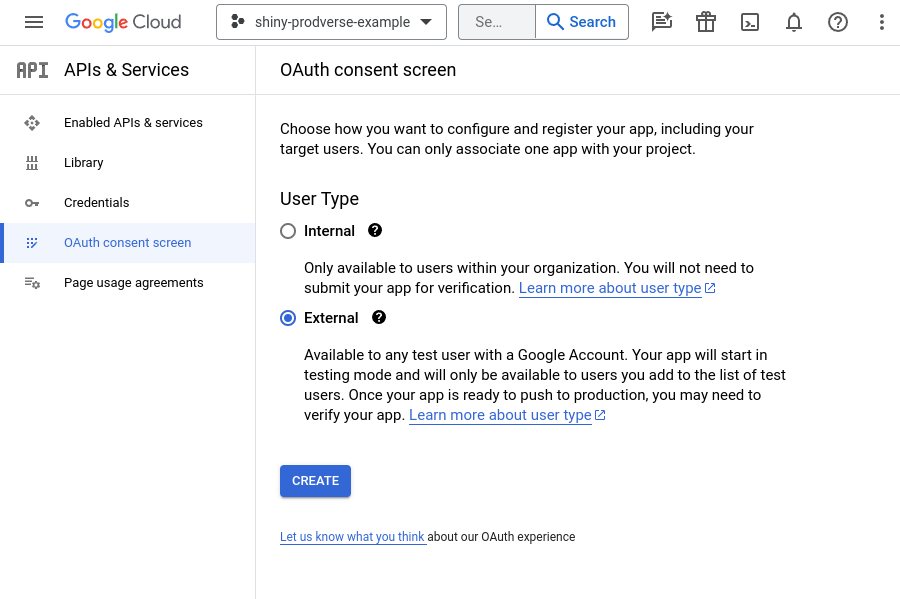
- Name your OAuth consent screen and fill out the required fields.
- Click
Save and Continue - Add the following none-sensitive scopes:

- Click
Save and Continue - Add your test users (Only if you selected
Externalin step 2) - Click
Save and Continue - Validate that the information is correct and click
Back to Dashboard
Step 3: Create an OAuth client ID
If you already have an OAuth client ID, you can skip this step, however, you will need to make sure that the client ID follows the fields as shown in this step.
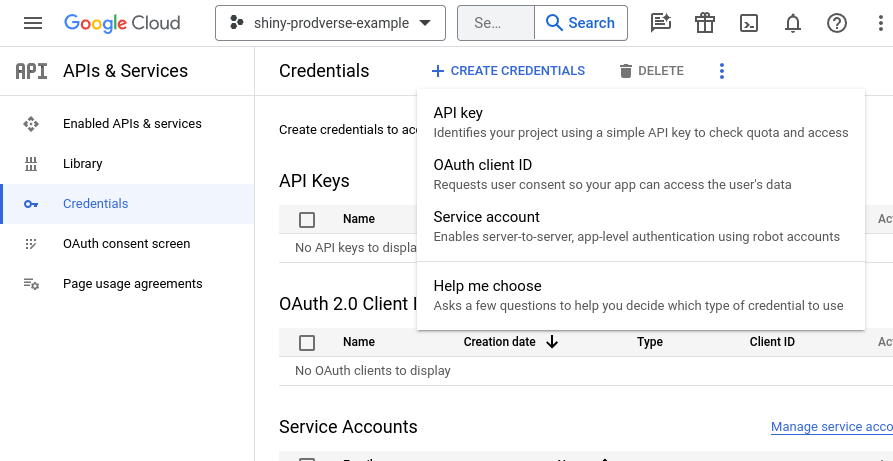
After clicking Create OAuth client ID, you will be presented with a
form you will need fill out. The following fields are required:
- Application type:
Web application - Name: Whatever you want to name your app
- Authorized JavaScript origins:
http://<your-domain>orhttps://<your-domain>(if you have SSL) - Authorized redirect URIs:
http://<your-domain>/loginorhttps://<your-domain>/login(if you have SSL)
For this example the domain will be example.com, so the fields you
be filled out as follows:
- Application type:
Web application - Name:
My Shiny App - Authorized JavaScript origins:
http://example.com - Authorized redirect URIs:
http://example.com/login
Make sure to replace example.com with your domain.
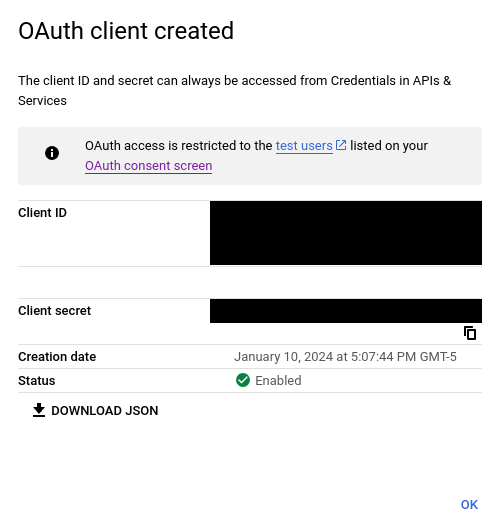
Once you have filled out the form, click Create and save
the Client ID and Client secret for later.
Step 4: Our Shiny app
For this example, we will create a very simple Shiny app that
will display a plot with a random distribution. The app will
use a slider to change the number of observations in the
distribution. This app will also use tapLock
to add authentication to the app. This app will also use it
to show nice welcome messages to the user.
Before building the app we will need to install tapLock
and shiny:
install.packages(c("shiny", "tapLock"))
Also, create an .Renviron file for testing purposes. If you
are using Docker or any other solution for your environment
variables, go ahead and do that instead.
# .Renviron
GOOGLE_CLIENT_ID=<your-client-id>
GOOGLE_CLIENT_SECRET=<your-client-secret>
APP_URL=<your-app-url>
Now this will be our app:
# app.R
library(shiny)
library(tapLock)

ui <- fluidPage(
  sidebarLayout(
    sidebarPanel(
      # A welcome message to the user
      h3(textOutput("welcome")),
      sliderInput("n", "Number of observations", 1, 100, 50)
    ),
    mainPanel(
      # A histogram of the generated distribution
      plotOutput("plot")
    )
  )
)

server <- function(input, output, session) {

  output$plot <- renderPlot({
    hist(rnorm(input$n))
  })

  output$welcome <- renderText({
    paste(
      "Welcome",
      # Here we extract the field "name" from the authentication token
      get_token_field(token(), "name"),
      "to the app!"
    )
  })

}

# We get the client id and secret from the environment variables
client_id <- Sys.getenv("GOOGLE_CLIENT_ID")
client_secret <- Sys.getenv("GOOGLE_CLIENT_SECRET")
app_url <- Sys.getenv("APP_URL")

# We create a new authentication configuration for Google
auth_config <- new_google_config(
  client_id = client_id,
  client_secret = client_secret,
  app_url = app_url
)

# Instead of using shinyApp(), we use tapLock::sso_shiny_app()
sso_shiny_app(auth_config, ui, server)
Step 5: Deploying the app
We have an app, now we need to deploy it. The exact method for deploying the app will depend on your environment, operating system, and other factors. For this example we will use Docker, however, you can use Systemd services, Windows services, or any other method you prefer. Docker is just a convenient way to deploy the app since anyone running Linux, Mac, or Windows can use it.
We will be using faucet, a
very lightweight web server that manages Shiny apps and Plumber APIs
with built-in replication and load balancing. It is also very easy
to use and configure.
First, we will create a Dockerfile:
# Faucet docker image tags have two components:
# 1. The faucet version
# 2. The R version
# For this example we will use faucet with R 4.3
# This will pull the latest version of faucet with R 4.3
FROM ixpantia/faucet:r4.3

# Install the required packages
RUN Rscript -e "install.packages(c('shiny', 'tapLock'))"

# We copy the app.R file to the image
# on the current working directory
COPY --chown=faucet:faucet ./app.R app.R

USER faucet
Note: From here on out, we will assume that you are working on your virtual machine, or at least where you mean to deploy the app. You can continue testing the app locally if you have setup the OAuth client ID to use
localhostas the origin and redirect URI. We will be exposing port 80 when we run the container, if you want to change this, you will have to setup the OAuth client ID to use the correct port.
Now we will build the image:
sudo docker build -t my-shiny-app .
Before running the container, remember we need to set the
environment variables. For this example, we will create a
file called .env anywhere on the server, we will assume
you run the following command on the same directory as the
.env file. If not, change the path to the absolute path
of the .env file.
sudo docker run --restart unless-stopped --env-file .env -p 80:3838 my-shiny-app
Here we are running the container with the environment variables
available in the .env file, and we are exposing port 80 on
the host to port 3838 on the container. If you want to use
another port, change the first number to the port you want
to use.
You should now be able to access your app at http://<your-domain>.
If you want to use SSL you will want to use a reverse proxy like
Nginx or Apache. Check out
Shiny Server: Running with a Proxy
for examples on how to do this. You can also read
faucet: With Reverse Proxy
for more information on how to use a reverse proxy with faucet.
Step 6: Tuning our deployment
Our deployment currently uses the base faucet configuration,
which is mostly great. However, you may want to customize
things like the number of workers (the number of concurrent
Shiny instances), if you are using a reverse proxy, you
will probably want to use the X-Forwarded-For or
X-Real-IP headers to get the real IP address of the user,
and other aspects of the deployment.
Number of workers
By default, faucet will use the number of CPU cores as the number of workers. This is usually a good default, however, you may want to change this depending on your app. For example, if your app is very CPU intensive, you may want to use less workers to avoid overloading the CPU. If your app is very I/O intensive, you may want to use more workers to avoid blocking the workers.
To change the number of workers, you can use the FAUCET_WORKERS
environment variable. For example, if you want to use 4 workers,
you can change the .env file to the following:
GOOGLE_CLIENT_ID=<your-client-id>
GOOGLE_CLIENT_SECRET=<your-client-secret>
APP_URL=<your-app-url>
FAUCET_WORKERS=4
Using a reverse proxy
When using a reverse proxy, you will want to use the
X-Forwarded-For or X-Real-IP headers to get the real
IP address of the user. This is because the IP address
of the user will be the IP address of the reverse proxy,
not the IP address of the user. This is important if you
want to properly log and load balance your app.
To use the X-Forwarded-For or X-Real-IP headers, you
can use the FAUCET_IP_FROM environment variable.
For example, if you are using Nginx, you can add the
following to your location block:
proxy_set_header    X-Real-IP $remote_addr;
proxy_set_header    X-Forwarded-For $proxy_add_x_forwarded_for;
Now you can change the .env file to the following:
GOOGLE_CLIENT_ID=<your-client-id>
GOOGLE_CLIENT_SECRET=<your-client-secret>
APP_URL=<your-app-url>
FAUCET_IP_FROM=x-real-ip
Step 7: Letting our app run in the background
Now that we have our app running, we want to make sure that
it keeps running even if we close our terminal. For this
we will run the container in detached mode and we will
use docker compose to manage the container.
First, we will create a docker-compose.yml file:
version: "3.9"
services:
  my-shiny-app:
    image: my-shiny-app
    restart: unless-stopped
    env_file: .env
    ports:
      - "80:3838"
Now we can run the container in detached mode:
sudo docker compose up -d
You can now close your terminal and the container will keep running.
Conclusion
You now have a public-facing Shiny app that is protected by Google authentication. You can share the URL with anyone you want and they will be able to access the app as long as they are added as test users in the OAuth consent screen.
Or if your app is internal, you can share the URL with anyone in your organization and they will be able to access the app as long as they are part of your organization.
You could improve this deployment by adding SSL, using a reverse proxy, fine-tuning the number of workers, and other aspects of the deployment. However, this is a good starting point for a public-facing Shiny app.